How to Insert Multiple Columns in Google Sheets Guide

Discover practical ways to insert multiple columns in Google Sheets and let an AI computer agent handle the clicks so your team saves time for real analysis.
Advanced computer use agent
Production-grade reliability
Transparent Execution

Why Google Sheets + AI help

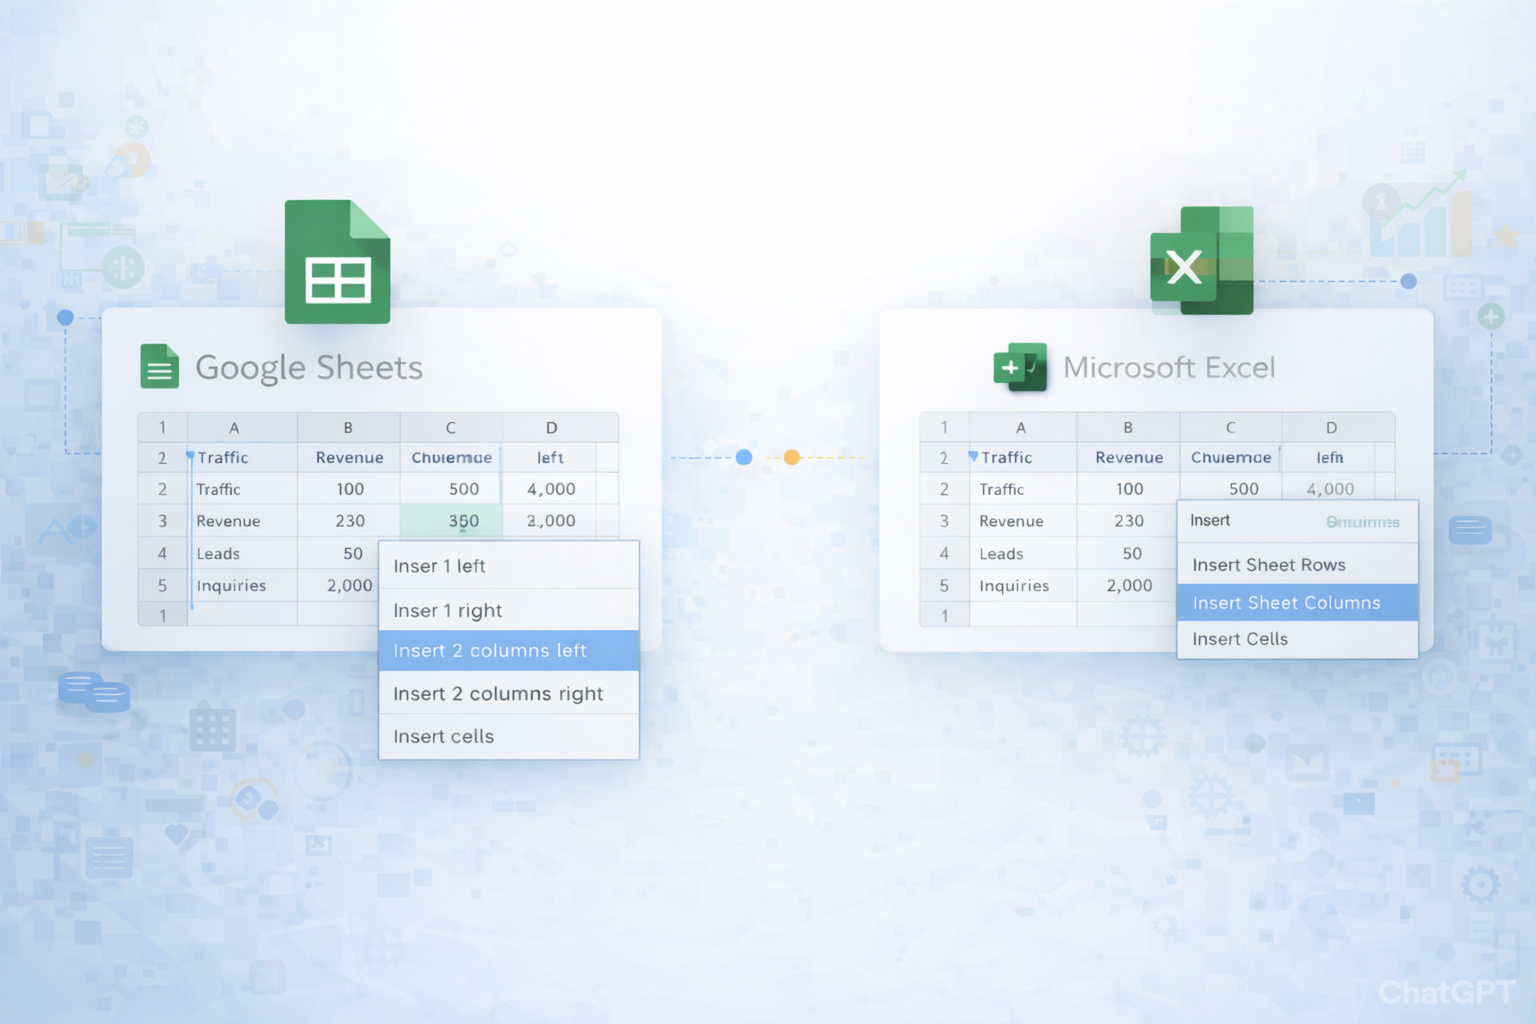
Picture your revenue ops lead on a Monday morning. She opens a quarterly report in Google Sheets and realizes she needs ten new metric columns between every major section: new CAC, LTV bands, lead sources by segment, experiment tags. She knows the mechanics—highlight columns, right‑click, insert—but repeating that dance across dozens of tabs steals an hour she doesn’t have.Knowing how to insert multiple columns efficiently is more than a spreadsheet trick; it’s how you keep dashboards adaptable as your business questions evolve. When you can reshape a sheet in seconds—via shortcuts, menu options, or templates—you avoid the silent tax of “I’ll fix the structure later,” which usually means never.Now layer on an AI computer agent. Instead of you hunting through columns, the agent can read your sheet, understand where new fields belong, and apply the exact insert pattern across every tab and file. You stay focused on which metrics matter; the agent handles where they live.

How to Insert Multiple Columns in Google Sheets Guide

### 1. Manual ways to insert multiple columns in Google SheetsBefore you automate, you need to master the basics. These are reliable, repeatable methods your AI agent will eventually mimic.#### Method 1: Using the right‑click menu (simple, visual)1. Open your spreadsheet in **Google Sheets**.2. Click the **letter header** of the first column where you want to add space (e.g., column E).3. To insert several columns at once, **drag across** more column headers to match how many you want (e.g., drag E to G to add 3 columns).4. **Right‑click** on the selected headers.5. Choose **“Insert 3 columns left”** or **“Insert 3 columns right”**.Google’s official guide to this behavior: [Add or move columns & cells](https://support.google.com/docs/answer/54813).**Best for:** Visual thinkers, one‑off edits on small sheets.**Limitations:** Slow and error‑prone on many tabs or workbooks.#### Method 2: Using the Insert menu1. Select the first column header where you want new columns.2. Go to **Insert → Column left** or **Insert → Column right**.3. To add multiple columns, first select multiple existing columns (e.g., E:G) and then use the same menu. Sheets inserts as many columns as you selected.**Best for:** Users who prefer menu navigation and want predictable behavior.#### Method 3: Keyboard shortcuts (power‑user mode)From the LiveFlow tutorial and Google help:- **Select the target range**: - Press **Ctrl + Space** (Windows/Chromebook) or **⌘ + Space** (Mac) to select the current column. - Hold **Shift** and press **→ / ←** to expand selection by more columns.- **Insert columns**: - Windows: **Ctrl + Alt + =** to insert columns to the left. - Mac: **⌘ + Option + =**.Alternative menu‑access shortcut (Chrome):- Press **Alt + I, then C, then C** to insert columns left of the selection.- Press **Alt + I, then C, then O** to insert columns right.**Best for:** Analysts, operators, and founders who live in Sheets all day.**Limitations:** Team‑wide adoption is hard; easy to forget combos.#### Method 4: Bulk insert at the bottomIf you need many empty columns or rows at the edge of your sheet:1. Scroll to the end of your sheet.2. Use the controls under the row numbers to add **“more rows at the bottom”**, or manually insert columns at the far right and then drag them where needed.Official reference for related resizing and structure changes: [Add or move columns & cells](https://support.google.com/docs/answer/54813).#### Method 5: Copy‑paste structure templates1. Maintain a **“Template” sheet** with the exact column structure you like.2. When you need that layout in a new tab: - Right‑click the template tab → **Duplicate**. - Or copy the template columns and paste them into another sheet.**Best for:** Agencies and sales teams that repeat similar reports for many clients.---### 2. No‑code automation methods (repeatable without coding)Once you’re beyond a handful of sheets, manual edits become a drag. No‑code tools and add‑ons can standardize how columns get inserted.#### No‑code Method 1: Google Apps Script via a simple add‑onMany Sheets add‑ons (including some finance and data tools) wrap small Google Apps Script snippets behind a button.A typical pattern:1. Install an add‑on from the **Google Workspace Marketplace**.2. Open your sheet → **Extensions → [Add‑on Name]**.3. Choose an action like **“Insert N columns after every metric column”**.4. The add‑on runs Apps Script that: - Scans headers. - Finds specific labels (e.g., `Revenue`, `Leads`, `Spend`). - Inserts new columns next to them.This gives you **one‑click repeatability**—especially useful when you onboard a new client and need the same report skeleton every time.#### No‑code Method 2: Automation from templates (finance and ops)Tools like LiveFlow provide templates that already rely on precise column layouts. When you create a new report:1. Start from a **template** tailored for P&L, cash flow, or sales metrics.2. The template already includes extra empty columns for custom metrics.3. To extend, you still use **multi‑select + right‑click Insert** as above, but the template ensures consistent placement.Reference tutorial on multi‑column insertion from a finance‑workflow angle: [LiveFlow’s guide on inserting multiple columns in Google Sheets](https://liveflow.com/product-guides/how-to-insert-multiple-columns-in-google-sheets).#### No‑code Method 3: Superjoin and similar data‑copilot toolsSuperjoin shows another pattern: turning text instructions into Sheet changes.Workflow:1. Install the **Superjoin Extension**.2. Go to **Extensions → Superjoin → Activate Copilot**.3. In natural language, type something like: > “Add three columns between B and C on every tab named ‘Client *’.”4. Review the preview.5. Approve to execute.Full tutorial: [How to Add Columns in Google Sheets | Superjoin](https://www.superjoin.ai/blog/how-to-add-columns-in-google-sheets).**Pros:**- No code.- Natural language instructions.- Great for marketers and agency account managers who don’t want to manage scripts.**Cons:**- Still bound to Sheets’ tab scope.- Someone must manually trigger the copilot.---### 3. At‑scale automation with an AI computer agent (Simular)Manual and no‑code methods work inside a single file. Simular’s AI computer agent goes further: it behaves like a power user who can navigate your entire desktop, browser, and cloud stack.#### AI Method 1: Agent standardizes report structures across accountsImagine your agency maintains **one Google Sheets report per client**—dozens of files, each needing two new attribution columns across several tabs.With Simular Pro:1. Define a **high‑level goal**: “For every Google Sheets file in this Drive folder, insert 2 new columns named ‘New Leads’ and ‘Qualified Leads’ after column D on all tabs starting with ‘Report_’.”2. The agent: - Opens your browser. - Navigates to **Google Drive**. - Iterates through each file in the folder. - For each relevant tab, uses the **highlight + right‑click Insert** pattern exactly as a human would, relying on the same rules from [Google’s official help](https://support.google.com/docs/answer/54813).3. You watch its steps in a **transparent execution log**—every click and keypress is inspectable and editable.**Pros:**- Works across many files and accounts.- No new API to wire; it literally operates the UI.- Production‑grade reliability for long, multi‑step runs.**Cons:**- Requires an initial investment to define and test the workflow.#### AI Method 2: Dynamic column insertion as part of a sales or marketing workflowYou can also embed column insertion inside a bigger pipeline:1. A CRM export lands in Drive daily.2. A Simular agent: - Detects the new file. - Opens it in Google Sheets. - Inserts multiple calculated‑metric columns (e.g., `SQL Flag`, `Campaign Tag`, `Owner Region`). - Fills formulas and formatting. - Pushes the enriched sheet into your BI tool or shares it with your sales team.Here, inserting columns isn’t a separate task; it’s a **step** inside an automated pipeline with thousands of actions. Simular’s **webhook integration** lets you trigger this from your existing production systems.#### AI Method 3: Self‑updating templates for recurring projectsFor agencies or B2B marketers who run similar campaigns each quarter:1. Maintain a **master reporting template** in Sheets.2. When a new client or campaign launches, a Simular agent: - Duplicates the template. - Inserts or removes columns based on a configuration file (e.g., whether the client uses LinkedIn, Google Ads, or TikTok). - Renames headers and adds notes for the account manager.**Pros:**- Eliminates onboarding overhead.- Guarantees structural consistency across all clients.- Every step is fully transparent and modifiable.**Cons:**- Requires clear naming conventions and folder structure.By combining the **manual knowledge of Google Sheets**, lightweight **no‑code tools**, and a robust **AI computer agent like Simular**, you turn “insert multiple columns” from a tiny, nagging chore into a fully automated, scalable capability in your operations.

Scale Google Sheets Columns with an AI Agent Guide

Train Simular for Sheets
Install Simular Pro, record one ideal Google Sheets session where you highlight columns, right‑click, and insert multiple columns, then save it as a reusable agent workflow.
Test and refine agent run
Use Simular Pro’s transparent execution log to replay the workflow on a sample Google Sheets file, tweak steps, add safeguards, and confirm columns insert correctly every time.
Delegate and scale tasks
Connect Simular Pro via webhook to your CRM or folder triggers so the agent automatically opens Google Sheets reports, inserts multiple columns, and scales the process across clients.

FAQS