

Every growing team hits the same wall with Airtable: it’s a brilliant operational database, but the rest of the company still lives in Excel. Finance wants multi-tab workbooks, leadership wants emailed spreadsheets before Monday’s standup, and clients demand exports they can open without learning a new tool.Exporting Airtable to Excel gives you the best of both worlds. Airtable stays your live, collaborative system of record, where sales, marketing, and ops log updates in real time. Excel becomes the analytical “stage”: you build pivot-heavy revenue reports, model budgets, create client-ready campaign recaps, or archive monthly snapshots for compliance. You can design Airtable views for each stakeholder, then export exactly what they need in a familiar format.Where it breaks is the grind: clicking into multiple bases, adjusting filters, downloading CSVs, cleaning columns, and saving the right filenames every single week. That’s where an AI computer agent shines. Instead of founders, ops leaders, or account managers babysitting exports, you hand those clicks to software that uses your desktop like an assistant. It opens Airtable, applies the right views, grabs fresh data, converts to Excel, and files everything in the correct folder—on a schedule or on command—so reporting stops stealing hours from selling and strategy.
If your business runs on Airtable but your stakeholders live in Excel, you’ve probably felt the friction: endless CSV downloads, manual clean-up, and late-night “just one more export” sessions. Let’s walk through practical ways to move Airtable data into Excel—from quick manual tricks to fully automated AI agent workflows you can delegate and scale.### 1. Manual ways to export Airtable to ExcelThese methods are perfect when you’re starting out or exporting occasionally.
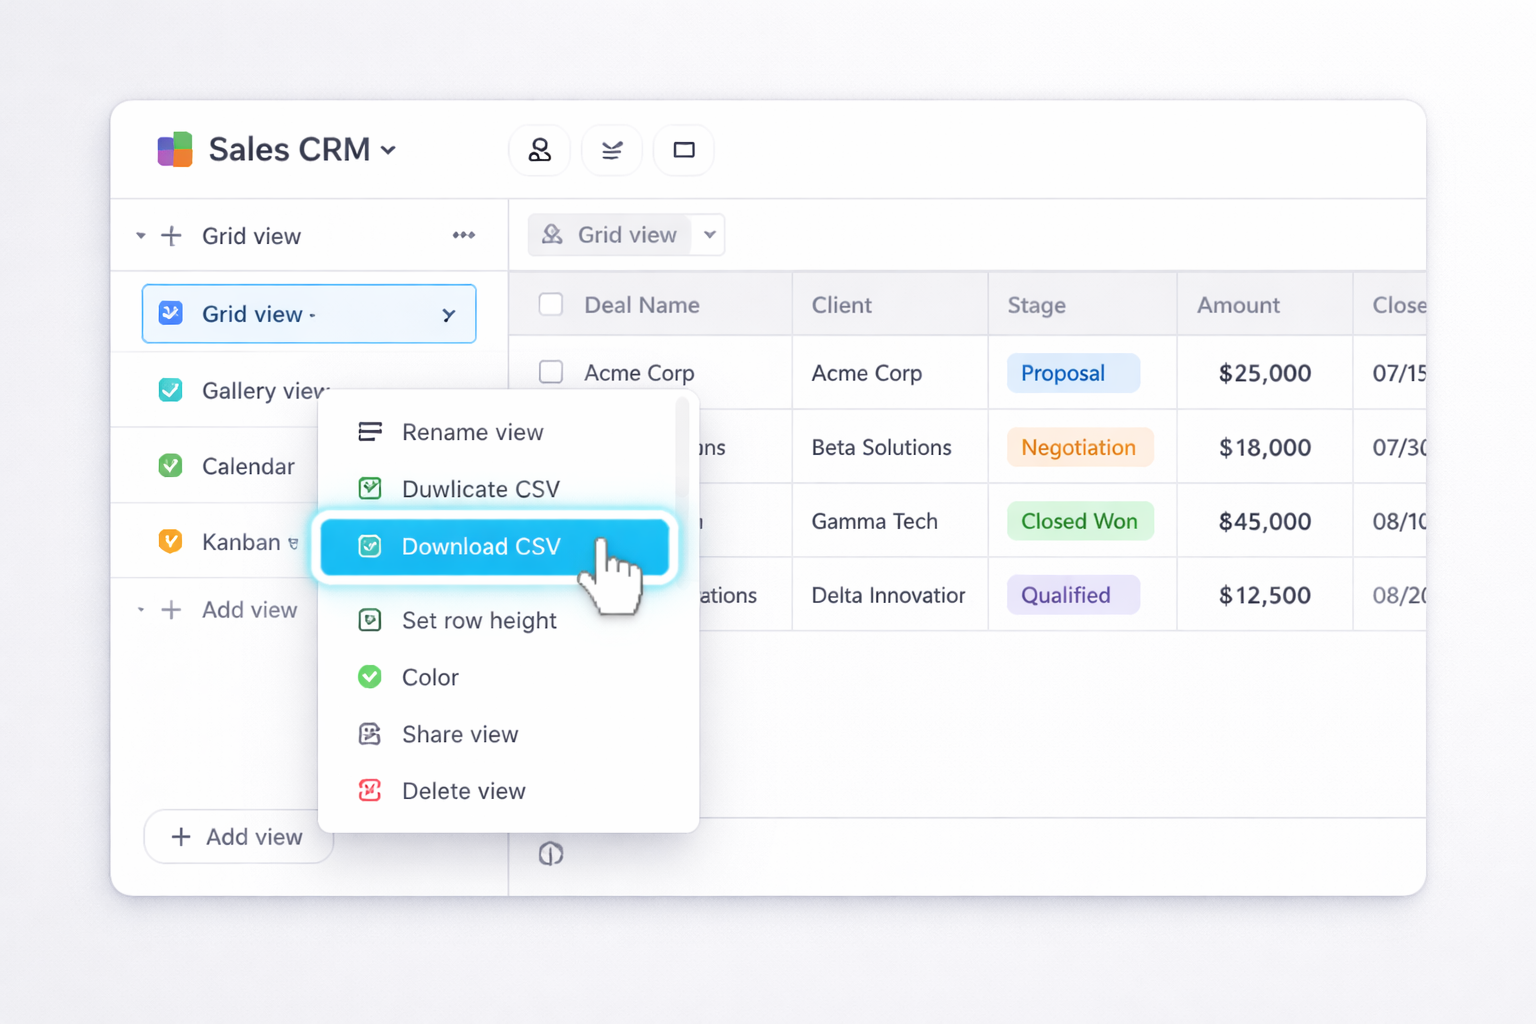
#### Method 1: Export a view as CSV and open in Excel1. In Airtable, open the base and **Grid view** you want to export.2. Make sure all the fields you care about are **visible** (hidden fields won’t be exported).3. Right-click the view name in the left sidebar.4. Click **“Download CSV”**.5. Airtable saves a `.csv` file to your default downloads folder.6. In Excel (desktop): - Open Excel. - Go to **File → Open → Browse**, select the CSV, and open it. - Or right‑click the CSV file, choose **Open with → Excel**.7. In Excel for web: go to **https://office.com**, open Excel, and drag the CSV into the file list or use **Upload**.Official docs:- Airtable CSV export: https://support.airtable.com/docs/exporting-records-as-csv- Excel CSV import: https://support.microsoft.com/office/import-or-export-text-txt-or-csv-files-5250ac4c-663c-47ce-937b-339e391393ba**Pros:** Simple, no extra tools, works on any plan.**Cons:** Fully manual, easy to forget steps, no scheduling, no automatic clean-up.#### Method 2: Export from an Airtable Interface listIf your team only has access to an Airtable Interface:1. Open the **Interface** your employees use (e.g., a List view of deals or tickets).2. Ask an admin to add the **Export** button component to that interface (if not already present).3. From the Interface, set any filters, grouping, or sorting.4. Click the **Export** button.5. Download the resulting CSV.6. Open it in Excel using the same steps as Method 1.**Pros:** Lets non‑admins export without seeing the base, respects interface filters.**Cons:** Still manual, no native scheduling, not ideal for multi-table exports.#### Method 3: Copy–paste from Airtable to Excel
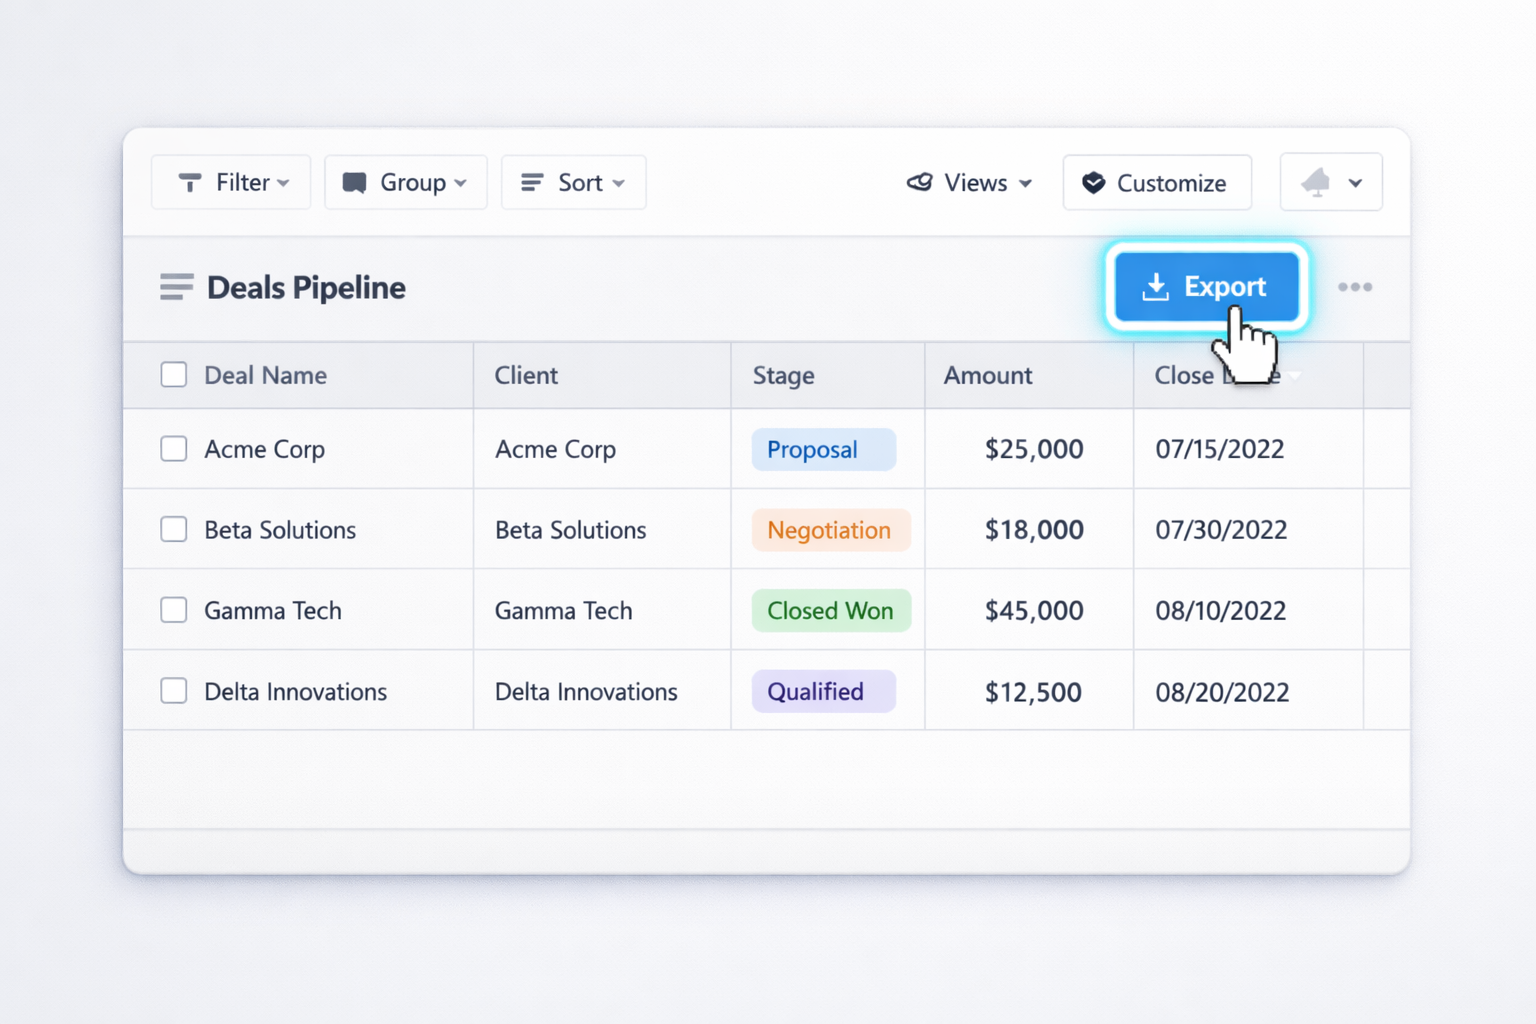
For quick, ad‑hoc exports of a few dozen–few hundred rows:1. In Airtable, open the desired view.2. Click the top‑left cell of the grid, then press **Ctrl+A / Cmd+A** to select all visible records.3. Press **Ctrl+C / Cmd+C** to copy.4. In Excel, click the top‑left cell where you want data to start.5. Press **Ctrl+V / Cmd+V** to paste.**Pros:** Very fast for small sets, zero configuration.**Cons:** No repeatability, easy to misalign columns, not good for attachments or large datasets.### 2. No‑code automation methods (Airtable + tools)
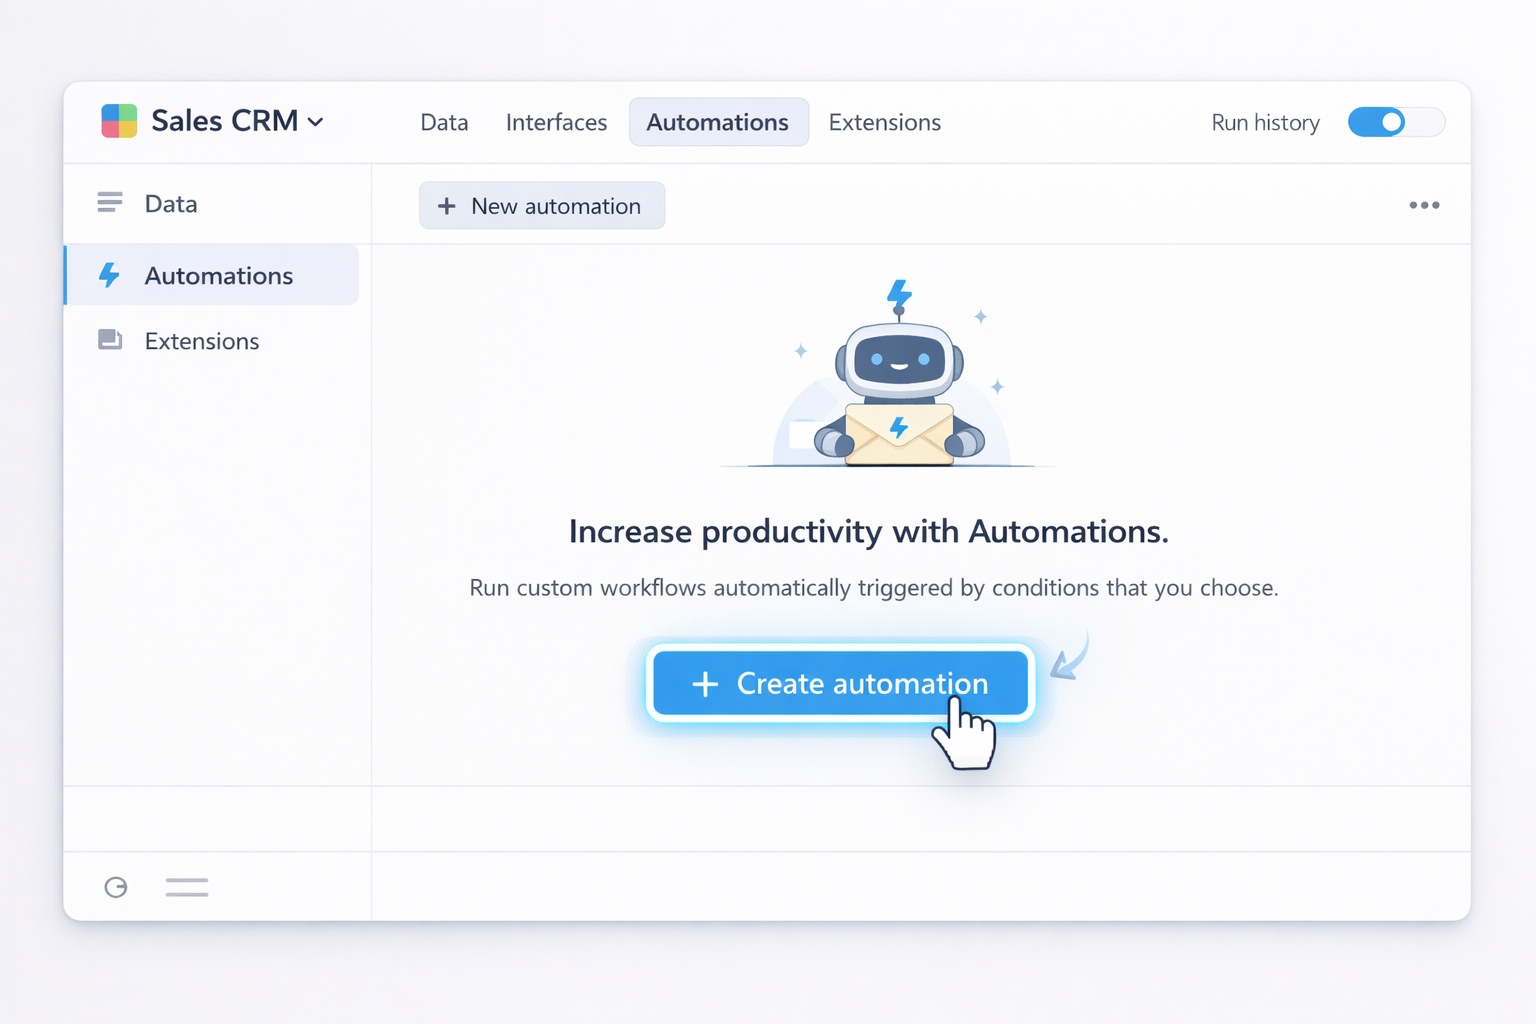
When you’re doing exports weekly—or every time a record changes—it’s time to automate.#### Method 4: Airtable Automation → Email CSVUse Airtable Automations to send CSV snapshots to your inbox or a shared mailbox.1. In Airtable, go to **Automations** (top bar).2. Click **“Create automation”**.3. Choose a trigger, for example: - **At scheduled time** (e.g., every Monday 7 AM), or - **When a record enters a view** (for incremental updates).4. Add an action: **“Send email”**.5. In the email body, include a link to the view and instruct recipients to use **Download CSV**.6. Optionally, use third‑party tools (like Make or Zapier) via **“Run a script”** or **“Run a webhook”** action to automatically attach exports.Docs:- Airtable Automations overview: https://support.airtable.com/docs/automations-overview**Pros:** Built into Airtable, good for reminder workflows.**Cons:** Still requires manual download/open; not full end‑to‑end Excel automation.#### Method 5: Sync Airtable to Excel with ZapierZapier connects Airtable and Excel Online (Microsoft 365) with no code.1. Create a Zapier account at **https://zapier.com**.2. Create a new Zap.3. **Trigger app:** Airtable. - Event: **New Record in View** or **Updated Record**. - Connect your Airtable account and select base, table, and view.4. **Action app:** Microsoft Excel. - Event: **Add Row**. - Connect your Microsoft 365 account and select the workbook and worksheet.5. Map Airtable fields to Excel columns.6. Test the Zap and turn it on.**Pros:** Near real‑time sync, no CSV handling, great for ongoing pipelines.**Cons:** Row‑by‑row sync, can be slower/expensive at high volume, structure changes require remapping.#### Method 6: Use a data pipeline tool (e.g., Hevo)Tools like Hevo (highlighted in the source articles) offer managed pipelines from Airtable to Excel/warehouses.1. Sign up for a data pipeline tool that supports Airtable as a source.2. Add **Airtable** as a source, using your API key and base ID.3. Add **Excel** (or OneDrive/SharePoint storage) as a destination.4. Configure table mappings and any transformations (e.g., normalizing date formats, flattening linked records).5. Set the pipeline schedule (e.g., every hour, nightly).**Pros:** Robust for analytics teams, handles schema evolution better, less manual oversight.**Cons:** Overkill for small teams, extra cost, some setup learning curve.### 3. AI agent-powered exports at scaleNo‑code tools are great, but they still assume clean APIs and simple schemas. Real life is messier: multiple bases, changing interface filters, 10+ exports before every board deck. This is where an AI computer agent—like a Simular-based computer-use agent—becomes your digital ops assistant.#### Method 7: AI agent that drives Airtable and Excel like a humanImagine you describe the job once: “Every Friday, export these Airtable views, convert them to XLSX, name them by week, and drop them in the Finance/Reports folder.” The agent does everything on your desktop:1. Launches the browser and logs into Airtable.2. Opens each specified base and view.3. Clicks **Download CSV**.4. Renames files according to your naming convention (e.g., `pipeline_2025-01-13.xlsx`).5. Opens Excel desktop or web, imports the CSVs, and saves as `.xlsx`.6. Moves the files into the correct shared folder or uploads to OneDrive/SharePoint.**Pros:**- Works even when APIs are limited (e.g., Interface views).- Can span browser, desktop Excel, network drives, email.- Execution is transparent—you can see every step.**Cons:**- Requires initial setup and “teaching” the workflow.- Best on stable UIs; big layout changes need a quick retrain.#### Method 8: Scheduled full-base backups with an AI agentFor agencies and operators worried about lock‑in or outages, use an AI agent for nightly or weekly backups:1. Define a checklist: bases, tables, and interface lists to back up.2. The agent logs into Airtable, cycles through each table or view, and downloads CSVs.3. It then opens Excel, converts or merges them into a multi‑sheet workbook per base.4. Finally, it stores the files in timestamped folders (e.g., `/Backups/Airtable/2025-01-13/`).**Pros:**- True “set and forget” backups without coding.- Human‑readable XLSX files that finance and leadership can open instantly.**Cons:**- Runs on your machine or a managed workstation; needs that environment available on schedule.#### Method 9: On-demand, context-aware exportsYou can go further and let your team “ask” for exports in natural language:- A sales manager drops a Slack message: “Give me today’s opportunities by owner.”- Your AI agent reads the request, opens Airtable, filters the Opportunities view to today’s records, exports to Excel, and replies with a fresh XLSX link.**Pros:**- Zero friction for non‑technical teammates.- Exports are always aligned with current filters and business questions.**Cons:**- Requires careful permissions and logging.- Needs a robust agent platform to orchestrate chat, browser, and Excel together.By starting with simple manual exports, then layering in no‑code tools, and finally delegating the repetitive, multi‑step work to an AI computer agent, you turn “exporting Airtable to Excel” from a weekly chore into an invisible background process that just happens.
For most teams, the simplest way is to export a single Airtable view as CSV, then open it in Excel.Here’s how:1. Open your Airtable base and choose the **Grid view** that has exactly the fields and filters you want.2. Make any last tweaks: hide fields you don’t need, confirm filters and sorting.3. In the left sidebar, **right‑click the view name**.4. Click **“Download CSV”**. Airtable will generate a CSV and save it to your default downloads folder.5. Open Excel (desktop), go to **File → Open → Browse**, select the CSV, and open it. Or right‑click the CSV file and choose **Open with → Excel**.6. Once open, immediately click **File → Save As** and save it as an **.xlsx** file.This keeps the process fast while giving you a clean Excel workbook you can format, add formulas to, or share with stakeholders.
If you need ongoing sync rather than one‑off exports, use an automation tool between Airtable and Excel.A no‑code option with Zapier:1. In Zapier, create a new **Zap**.2. Set **Airtable** as the trigger app with event **“New Record in View”** or **“Updated Record”**.3. Connect your Airtable account and choose the base, table, and view you want to sync.4. Add **Microsoft Excel** as the action app with event **“Add Row”**.5. Connect your Microsoft 365 account and select the target workbook and worksheet.6. Map each Airtable field (Name, Amount, Stage, etc.) to the correct Excel column.7. Test the Zap, fix any mapping issues, then turn it on.From that point on, new or updated records that match your Airtable view conditions will automatically appear as rows in Excel, keeping your spreadsheet current without manual exports.
Airtable exports exactly what’s visible in the current view, so the trick is to design a view that reflects the filters and sorting you need before you export.Do this:1. In Airtable, create a new **Grid view** (e.g., “Excel – This Month’s Deals”).2. Add **filters** such as `Close Date is this month` or `Status is Active`.3. Apply any **sorting** (e.g., by Owner, then by Deal Size) and hide columns you don’t want in Excel.4. Double‑check the resulting grid: only the records you care about should be visible.5. Right‑click the view name and select **“Download CSV”**.6. Open that CSV in Excel and save as `.xlsx`.Groups in Airtable don’t directly export as separate Excel tabs, but your grouping and sorting will still make it easy to recreate sections or pivot tables in Excel after import.
Airtable doesn’t have a one‑click “export base to Excel” feature, but you can approximate full backups by exporting each table (or key views) and storing them as sheets in a workbook.Manual approach:1. List the tables you need to back up (e.g., Leads, Deals, Activities).2. For each table, open a Grid view that contains all relevant fields.3. Right‑click the view name → **“Download CSV”**.4. In Excel, create a new blank workbook.5. For each CSV, open it in Excel, **Move or Copy Sheet** into your backup workbook, and rename the sheet to match the Airtable table.6. Save the workbook with a clear timestamped filename like `crm_backup_2025-01-13.xlsx` and store it in a backed‑up location.To avoid doing this by hand every week, you can script it with automation tools or use an AI agent to perform the same clicks and file moves on a schedule.
An AI computer agent can take over the repetitive desktop work you usually do yourself. Instead of you logging into Airtable, clicking “Download CSV,” cleaning the file, and saving it into the right folder, the agent performs those exact steps on your behalf.A typical workflow:1. You define the rules once: which Airtable bases and views to export, how often, and where the Excel files should live.2. On schedule, the agent opens your browser, signs into Airtable, and navigates to each view.3. It clicks **“Download CSV”**, waits for the file, then opens Excel.4. In Excel, it imports the CSV, saves it as `.xlsx`, applies any standard formatting, and renames it based on date or reporting period.5. Finally, it moves or uploads the workbook to your chosen folder (local, shared drive, or cloud).Because the agent’s execution is transparent, you can inspect each step, then gradually trust it with more exports while you focus on analysis, sales, or client work.